Anki is often used to study Japanese. I had made a guide many years back for using it with TextFugu, so I figured I should do one here as I often see people ask questions about it.
I was using Anki version: 2.0.51 and Windows 7 for the first two sections.
I was using Anki version 2.1.14 and Windows 10 for the second two (as they were added a year later).
For the most part this should only affect the visuals, but there may be some slight differences in the layout of options as well. If things look too different from the latest version (in the future) let me know and I’ll try to update this guide.
Sections (click to expand)
The following sections use Anki 2.0 (If anyone would like to see these redone for Anki 2.1 leave a message)
Basic Tutorial
First off I’ll show you how to make your own basic stuff from scratch, then I’ll show you what some of my stuff looks like, and eventually how to add some of the extra stuff I have (which if you notice places where I have extra options, it’s likely because I’m using an add-on).
First we go to the main screen and I’ll make a new deck with three subdecks:
(Note: Colors will look different as I’m using a Night Mode add on… Because I’m Batman!)
So I hit Create Deck at the bottom and name it Japanese.
Then I do it again and name the new deck Kana
Again and I name the deck Kanji
Again and I name the deck Meaning
Again and I name the deck Sentences
Again and I name the deck Audio
I then drag the Kana, Kanji, Meaning, Sentences, and Audio decks into the Japanese deck, which makes them all subdecks of Japanese deck:

(Note: They auto alphabetize)
I’ll then go to Tools–> Manage Note Types:

Click Add choose Add: Basic and click OK

Name it Japanese and hit OK

(Note: I have a bunch of Note Types just focus on the one we made: Japanese)
I then make sure the Japanese Note Type is selected and click on Fields

Fields are the areas where you can add information for your cards.
So normally you have information on the front of a card and information on the back of a card. When you study your cards it will show the info on the front of the card which will contain whatever info you have added for the Front field, then when you click Show Answer it will show whatever info you have added for the Back field.
That’s fine for simple study items, but Japanese is much more complex, so we’re going to jack this up to 11 and add some nuance. ![]()
First off we’re going to rename Front and Back as we need more than just two dimensions (yep going full Inception).
So I will rename Front to Kana (it’ll warn you that it has to rebuild stuff, that’s fine)
Rename Back to Kanji

Add a new field Meaning

Then do this again making the fields: Sentence, Sentence Meaning, and Audio

Close this and then select Cards
It now shows:
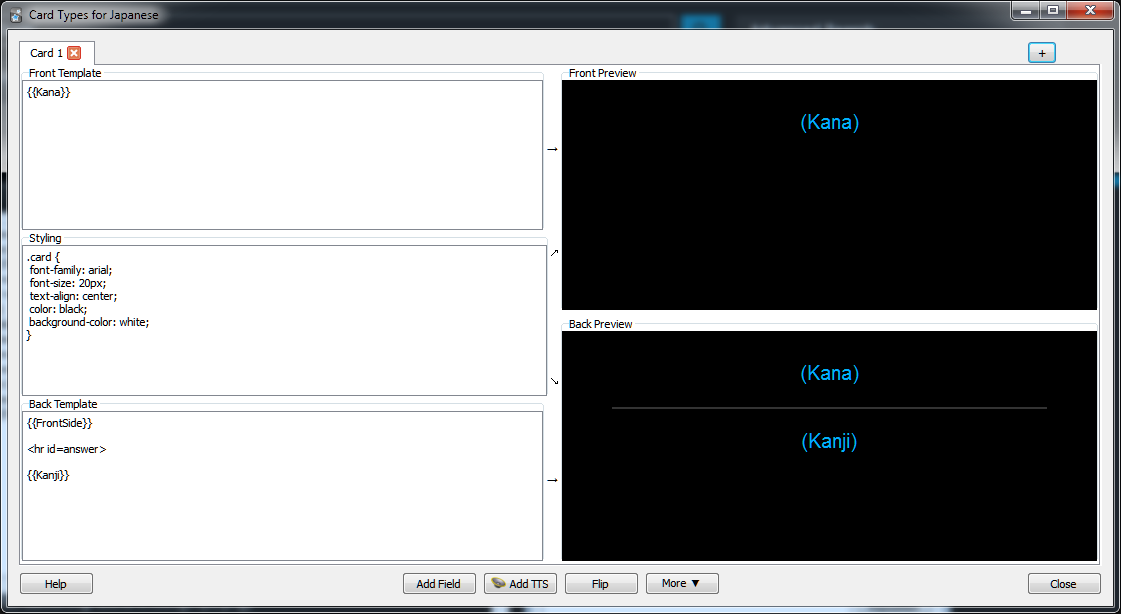
So under Card 1 you see three sections: Front Template, Styling, and Back Template
The Front Template represents the information that I will have on the front of my card
Styling is for formatting the look of your cards
The Back Template represents the information that I will have on the back of my card
So as default, if I made a new card right now and put the required information into the required fields it would create a single card that had Kana on the front and when I hit Show Answer it would display the Kanji on the back.
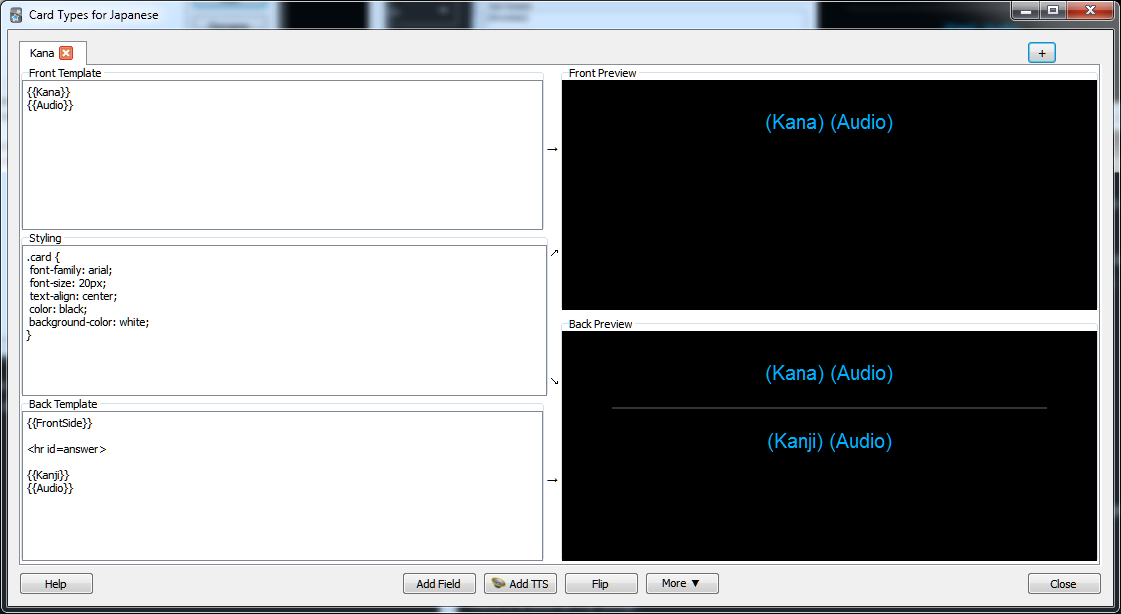
That’s good, but I also want to add Audio so I’m going to modify this a bit by adding the Audio fields to the Front and Back Templates:

So to add a Field you can do it manually by just typing in the name of the field with curly brackets around it: {{Audio}}
Or you can choose Add Field from the bottom, which you can also further use to alter how it displays that specific field on the card.
To the right you can see a preview of the card which shows that it will display the Kana and play the Audio associated with it on the Front and then display the Kanji and play the Audio when it shows the back.
So the important bits for now are:
Front Template:
{{Kana}}
{{Audio}}
Back Template:
{{Kanji}}
{{Audio}}
Now I don’t want just one card for each Japanese term I’m studying, so as I said earlier we need to get multidimensional. ![]()
First I’ll rename Card 1 to be more specific to our needs.
Choose More from the bottom and select Rename
Rename Card 1 to Kana
We now have a Kana card type, next we’ll make a Meaning card type.
Click on the + at the top right.

First rename Card 2 to Meaning
Next delete the part that says “Edit to customize” and the br in angle brackets
Then replace the:
{{Kana}}
{{Audio}}
with
{{Meaning}}
On the Front Template
And then add:
{{Kana}}
Before
{{Kanji}}
{{Audio}}
On the Back Template

Now if you added the fields through the tool it will put each field on a separate line.
If you did it manually you will have to add a break between each field yourself:

You don’t really need to put in a break before Audio as it won’t actually show up on the card, it’s just generating sound, but if you think it looks more tidy…
We now need to make the last three card types. To make it more efficient I’ll write the rest out as a format.
The first two cards would be displayed in this format as follows:
Card Type: Kana
Front Template:
{{Kana}}
{{Audio}}
Back Template:
{{Kanji}}
{{Audio}}
Card Type: Meaning
Front Template:
{{Meaning}}
Back Template:
{{Kanji}}
{{Kana}}
{{Audio}}
So make the last three with the following:
Card Type: Kanji
Front Template:
{{Kanji}}
Back Template:
{{Kana}}
{{Meaning}}
{{Audio}}

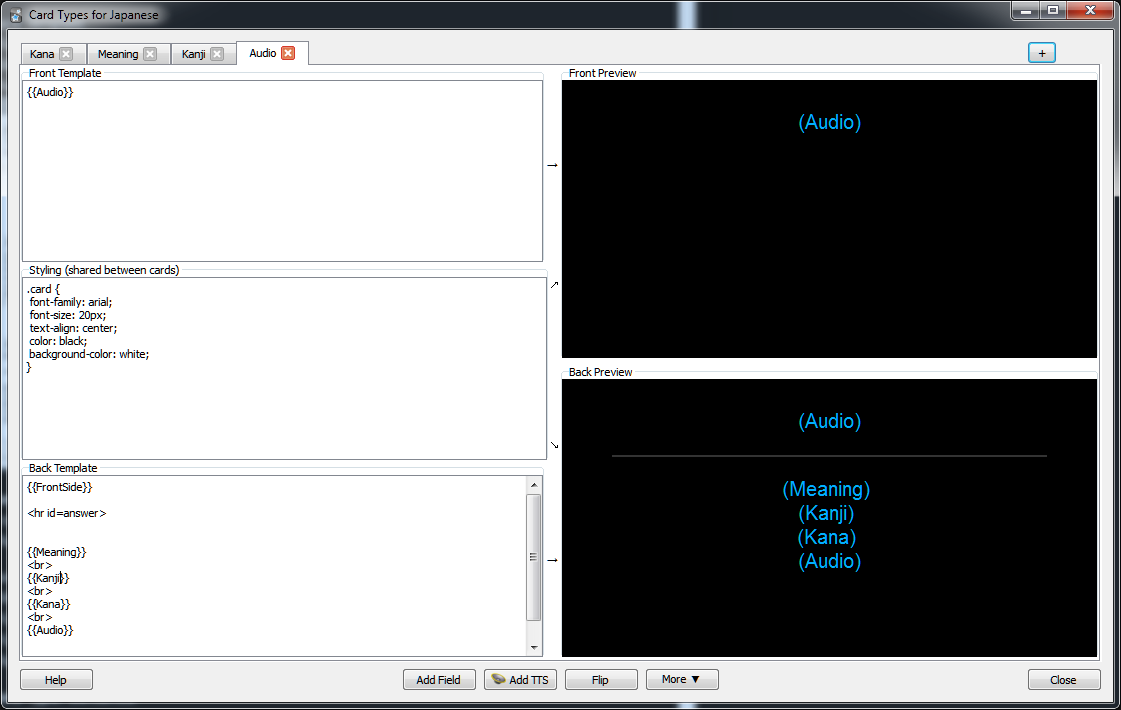
Card Type: Audio
Front Template:
{{Audio}}
Back Template:
{{Meaning}}
{{Kanji}}
{{Kana}}
{{Audio}}
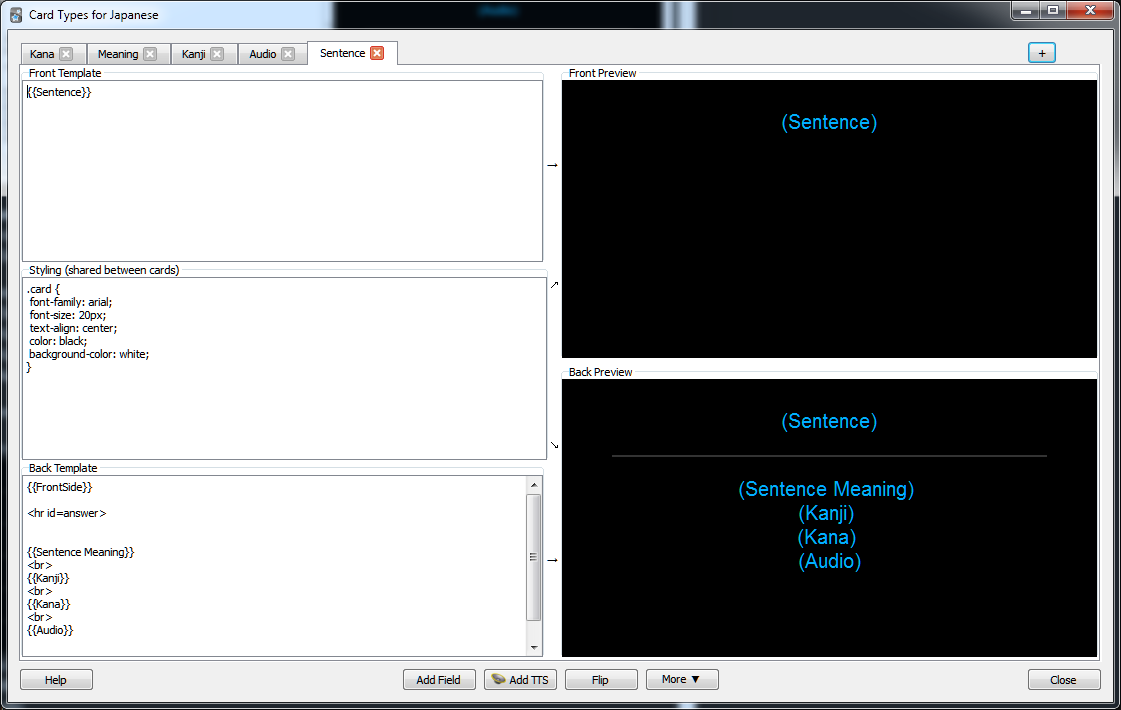
Card Type: Sentence
Front Template:
{{Sentence}}
Back Template:
{{Sentence Meaning}}
{{Kanji}}
{{Kana}}
{{Audio}}
Next we need to specify which subdeck each of these cards will be placed in each time we generate one.
Click More and choose Deck Override
Select Japanese::Sentences

This means that any Sentence card that is created will be put in the Japanese main deck and more specifically the Sentences subdeck.
Do the same thing for the other Card Types
We currently have:
Sentence Card Type = Japanese::Sentences
So now make:
Sentence Card Type = Japanese::Sentences
Audio Card Type = Japanese::Audio
Kanji Card Type = Japanese::Kanji
Kana Card Type = Japanese::Kana
Now that all the background stuff is set up, we can enter the required information for each Japanese term we wish to study and it will automatically create five different cards and split them into our subdecks.
Let’s give it a go!
Close the windows until you are back onto the Main Menu.
Click on Japanese

Click Add

Now we add our info:

Note: Sentence taken from Bunpro, shout out to @pushindawood
Don’t worry about the audio for now, I’ll have to write up an entire section for that.
As for the Tags, you can leave this blank for now, or you can start grouping similar words together like using a Tag for Noun, Verb, Adj, etc or Household-Items, Restaurant-Terms, etc. Later I will have a section showing how you can do a search for cards using Tags or study all the cards that have a particular Tag at once. They are very easy to add and get rid of them in mass if you decide to use a different format for your Tags later. Each term can have multiple Tags, just split them up using spaces, which of course also means each Tag can’t contain a space or it would be counted as two Tags.
OK, click add and let the magic happen! ![]()
Close that window.
Click Decks to return to the Main Menu and Behold the ![]() Glory!
Glory!![]()

You can now either click on the main deck “Japanese” and it will allow you to study all the cards in the subdecks, or you can click on a specific subdeck and just study those specific cards.
When/if you include an Audio file it will automatically generate an audio card and add it to the Audio subdeck.
This is the end of the basic tutorial.
Be fruitful and multiply! Your cards that is… Or whatever else… ^ _ ^
Modifying Your Cards and Adding Extra Fields
First here’s a look at one of my actual decks.
It shows that I have 51 cards due in the entire deck and one new card that I haven’t studied yet.
(Note: Normally that would also show in one of the subdecks, but I manually moved it to the main deck)
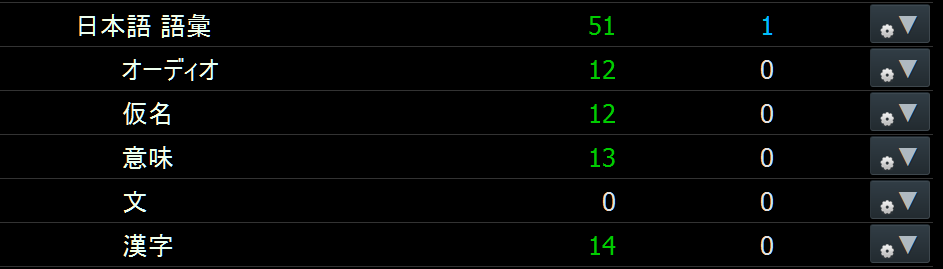
So it’s basically set up just like the example deck from before I just have Japanese titles instead of English ones.
Main deck labeled: Japanese Vocabulary
With the following subdecks:
Audio
Kana
Meaning
Sentences
Kanji
(I have no idea how it determines order with Kanji)
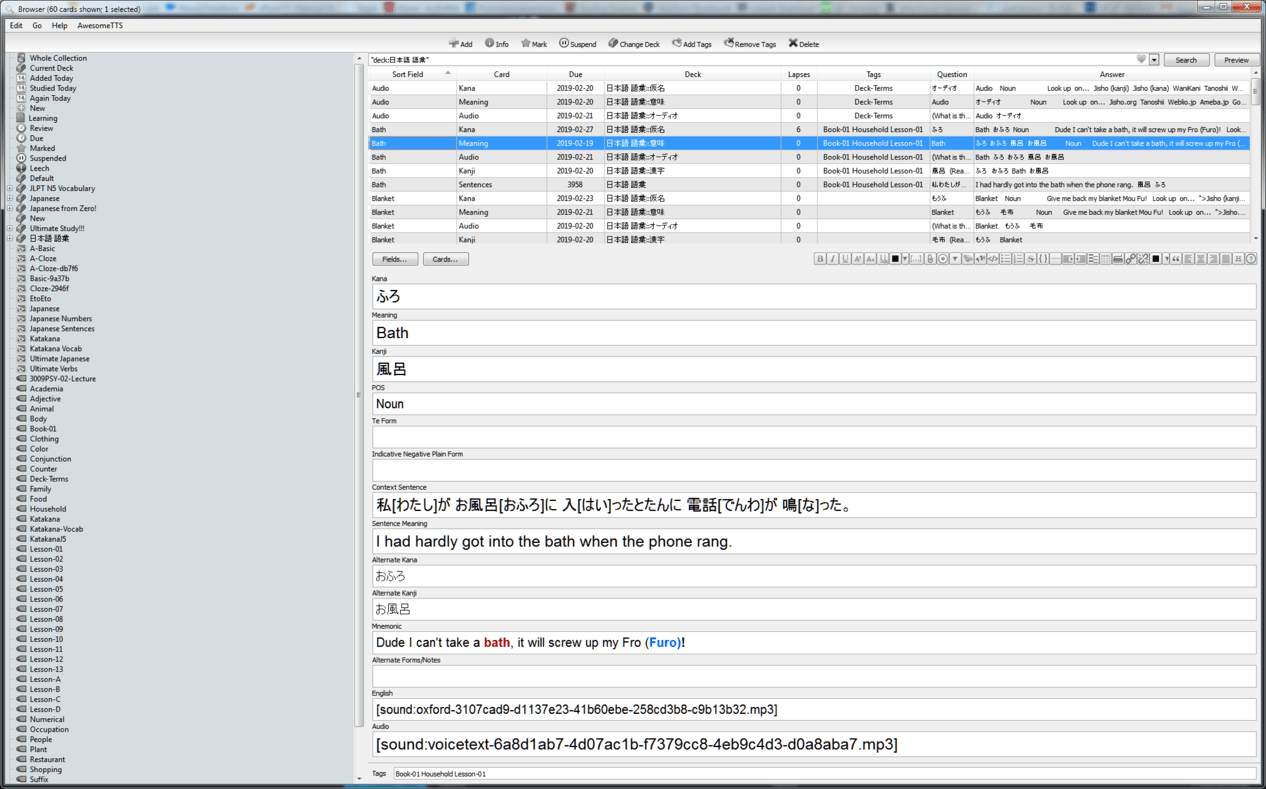
Now if I hit Browse from the main screen:

It shows the following:

If I click on that I get this:

Which lists all the cards in that deck.
It also shows various information about each card and has some options for them at the top.
As you can see, I have a lot more Fields than what I have in the basic tutorial.
From here I can alter whatever data I’ve included in each field.
You can also see that it only has three cards listed for the term Audio. This is because I have only added data to the Kana, Meaning, and Audio fields. So it has only created three cards.
If I now added Kanji data or Sentence data, it would create a new card and send them to my Kanji or Sentence subdecks.
So if you want to create cards, but don’t have all the data you need, you can always add it later.
It also has links to the Fields and Cards options which you can modify from here for convenience
So the Fields I have set up for this deck are:

I can add new ones, delete them, rename, or reposition them.
Their position only matters for how they show up on the Browser and Add screens, which you can arrange in whatever order you wish aesthetically (there are other reasons to reorder them, but it’s kinda self evident if/when you learn about those other things, which I’ll cover later)
Something you will want to do now though is choose which field you want the Browser to sort by.
I chose Meaning as it’s easier to alphabetize and find stuff in English.

So I chose the Meaning field and clicked Sort by this field in the browser.
I’ll close that now and we’ll look at what you can do with additional fields.
If I choose another card that has more fields filled out:
You can see the the different types of extra info you can include in each card.
Notice that even though it has more fields, I still only have five cards for this term.
If I now click on Cards:

It shows that I haven’t set up a different Card Type for every Field. I’ve simply included more fields within each Card Type. If I wanted to I could add more Card Types and add whatever fields I wanted to them or I could delete the ones I have by hitting the x by the name.
This one is pretty similar to the format I did before in the example deck.
Front Template
{{Kana}}
{{Audio}}
Styling
I’ve made some modifications to this from the default
Back Template
{{Meaning}}
{{Alternate Kana}}
{{POS}}
{{Te Form}}
{{Indicative Negative Plain Form}}
{{Alternate Forms/Notes}}
{{Mnemonic}}
{{Audio}}
{{English}}
So the front of the card shows Kana and plays Japanese Audio. The back of the card shows the Meaning, Alternate Kana, POS (part of speech), the Mnemonic I created, replays the Japanese Audio, and then plays English Audio based on the meaning.
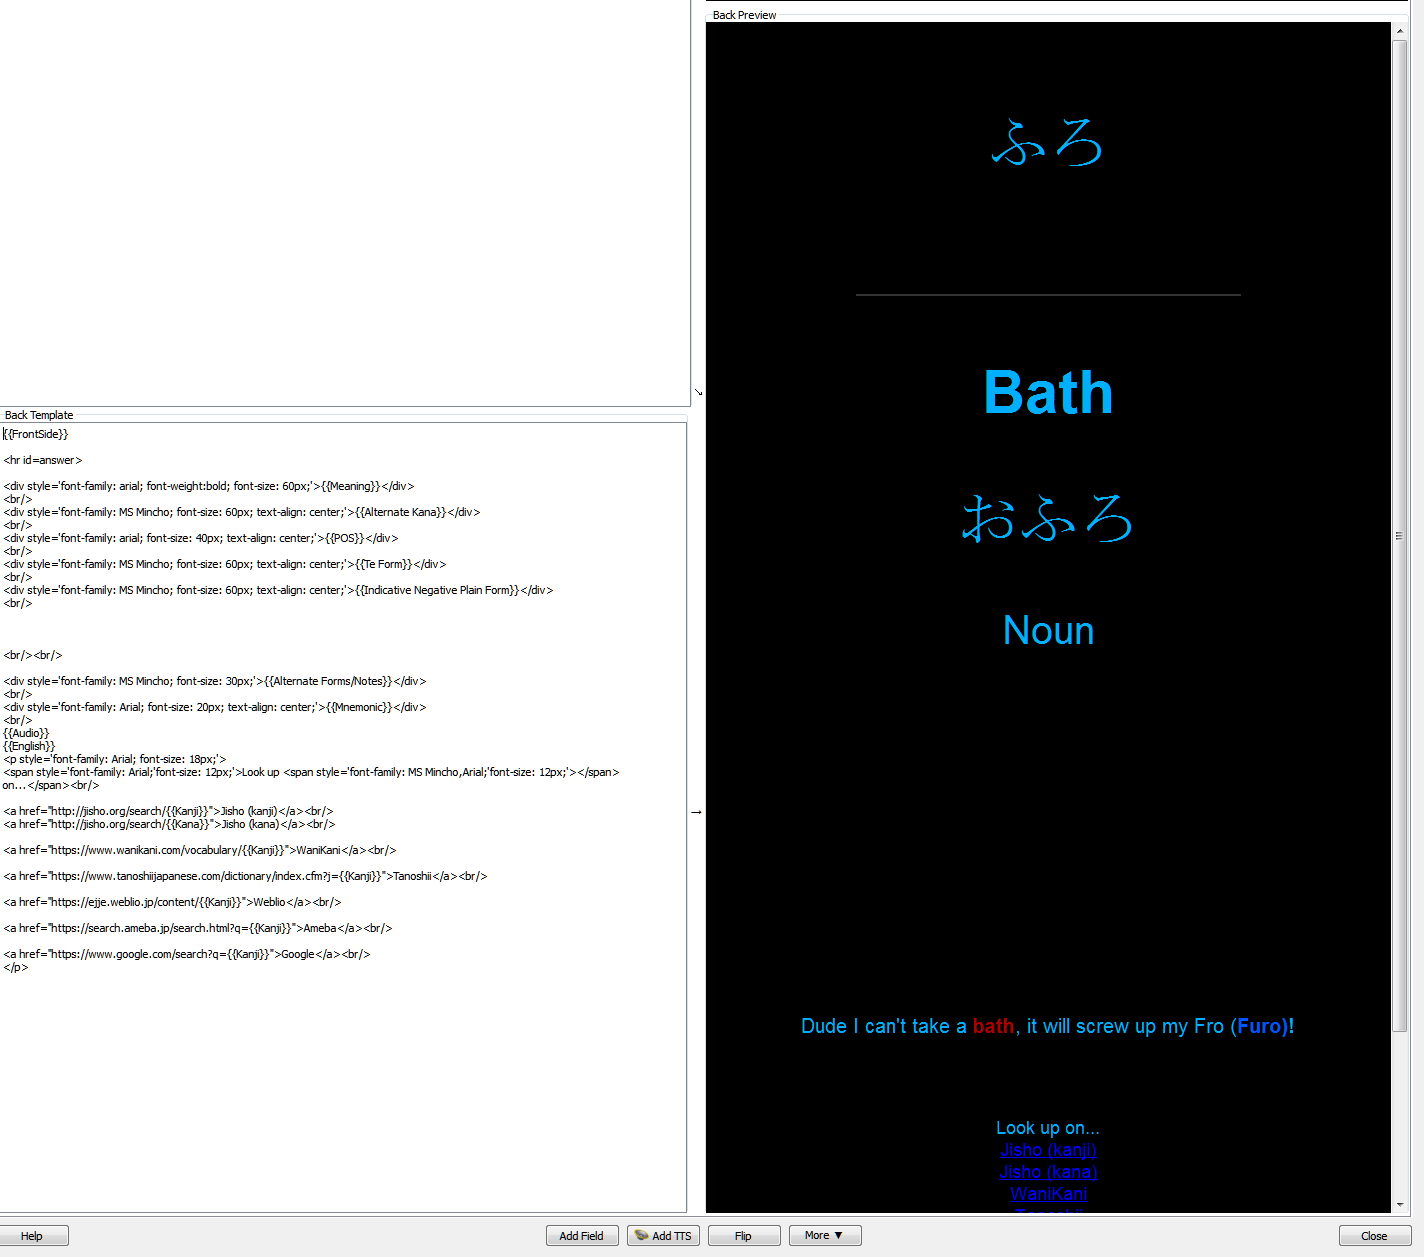
(Note: In the preview to the right it shows the Kana from the front of the card with a little line under it indicating the divide between the front and the back.)
Additionally I’ve added some links at the bottom to various dictionaries. I just add whatever field tag I want to insert into the url and it fills out this info automatically (I got this idea from @hinekidori ![]() )
)
The following is how I’ve set up each Card Type in this deck:
Kana Deck
Front Side:
{{Kana}}
{{Audio}}
Back Side:
{{Meaning}}
{{Alternate Kana}}
{{POS}}
{{Te Form}}
{{Indicative Negative Plain Form}}
{{Alternate Forms/Notes}}
{{Mnemonic}}
{{Audio}}
{{English}}
Meaning Deck
Front Side:
{{Meaning}}
{{English}}
Back Side:
{{Kana}}
{{Alternate Kana}}
{{Kanji}}
{{Alternate Kanji}}
{{POS}}
{{Alternate Forms/Notes}}
{{Mnemonic}}
{{Audio}}
Audio Deck
Front Side:
{{Audio}}
Back Side:
{{Meaning}}
{{Kana}}
{{Alternate Kana}}
{{Kanji}}
{{Alternate Kanji}}
{{Audio}}
{{English}}
Kanji Deck
Front Side:
{{Kanji}}
Back Side:
{{Kana}}
{{Alternate Kana}}
{{Meaning}}
{{Alternate Kanji}}
{{Audio}}
{{English}}
Sentence Deck
Front Side:
{{furigana:Context Sentence}}
Back Side:
{{Sentence Meaning}}
{{Kanji}}
{{Kana}}
{{Alternate Forms/Notes}}
The following sections use Anki 2.1
Night Mode
Night Mode (Because you’re Batman!)
It used to be that you needed to download an add-on to access Night Mode, with the update to Anki 2.1, it is now a built-in feature.
To access this feature, click on Tools → Preferences → Tick Night Mode and save your eyes from the blistering white hell!

Adding Audio, Images, or Video
Audio:
So adding audio is pretty simple if you have your own audio files.
Go to “Browse,” as detailed in the Modifying Your Cards section above, and choose one of your cards.
Next use your cursor to select the Audio section of the card.
Once you have the Audio section selected, just hit the paper clip at the top (or hit F3), select your audio file, and click Open. Voilà!

(Note that with the cards I’m using in the example, my Audio section is called Sound. I’m using these cards as they don’t have audio added to them yet.)
So simple! ^ _ ^
In fact you can also add images or even video clips the same way. Just make sure you add them to the appropriate field.
Alternately, you can hit the Microphone icon and directly record sound to the card. I haven’t done this yet myself, so I’m assuming it should be straightforward, but let me know if there’s anything weird that you have to work out with it.
If you are trying to figure out how to get your cards to play these audio files, this is described in the first section.
Bonus! There is also a separate section that shows you how to generate sound files for your cards automatically.
Video:
Just read the audio section and choose a video file instead of a sound file. I would suggest creating a new field called “Video” though to keep everything organized properly, if you decide to use this feature (I haven’t myself).
Images:
You could follow the instructions from the Audio section and just choose an image file rather than an audio file, making sure to put it in the appropriate field, but there is an easier way to do it.
If you go to a website and select Copy Image (Firefox version), you can simply select the field that you want the image in and hit Ctrl+V to paste it directly in. Anki will save it to your computer, so you don’t have to worry about hot linking. ^ _ ^


Adding Clickable Links to Your Cards
Adding Clickable Links to Your Cards
By doing the following, you can add a link on all of your cards that will allow you to automatically search a given website for a specific variable within the card.
For instance if you have a Kanji field on your cards that display a word in Kanji, you can automatically generate a link that would look those Kanji up on a website like Jisho.org.
The following code can be added to the “cards” section (see the section on Modifying Your Cards and Adding Extra Fields) to add clickable links to cards:
![]()
So you basically have three variables here that need to be accounted for:
-
The website url
-
The applicable field
-
The text that will show up on the card
So above I have
-
a link to Jisho.org
-
Within the url I’ve added the field that I want the url to link to: {{Kanji}}
(make sure you have the squiggly brackets)
- I have the text that will be displayed on the card: Jisho (kanji)
So with the url portion, choose a site that you can look stuff up on and search for something. Copy that url and then simply take the part of the url that contains the search term and replace it with the field name in squiggly brackets. Then add what ever text you want displayed on the card that you can click on to do that search.
Here’s a whole slew of different examples:

Here are a few you can copy and paste to get the basic code layout:
Look up on...<br/><a href="{{Kana} - Jisho.org}">Jisho (Kana)</a><br/>
<a href="http://www.japaneseverbconjugator.com/VerbDetails.asp?txtVerb={{Kanji}}">Conjugator (Kanji)</a><br/>
<a href="http://www.japaneseverbconjugator.com/VerbDetails.asp?txtVerb={{Kana}}">Conjugator (Kana)</a><br/>
<a href="https://www.japandict.com/{{Kana}}?lang=eng">JapanDict</a><br/>
So you would input something like the above, in this section here on the “cards” menu:

To the right shows what those links will look like on the card.
It’s recently come to my attention that you can look up an entire sentence on Jisho and it will parse it for you. So you could thus use the field in your cards that contain an example sentence and generate a link that would search Jisho and give you said results. This is much easier than having to manually look something up on a website to check your understanding of something or having to copy the info manually into your cards if there is some specific detail from the site that you want included on your cards.
Backing up your Decks
Backing up your Decks
The first option to back up your decks is to simply open Anki:
Click File, choose Export, click Export.
Choose where to save the file and you’re done.
This should give you a backup called “collection-(date and time).colpkg” in your folder of choice. If you open this file (first you will have to point your computer to use Anki to open it if you are using Windows 10) it will try to overwrite your current decks with the back up decks, so even though it warns you before it happens, don’t do this by mistake, as it will replace your current data. Unless of course you want to do that because you screwed something up, in which case it’s a good thing. ![]()
The second option for backing up your decks is when you haven’t made a backup yourself, but you’ve screwed something up and are thinking:
Imgur: The magic of the Internet
Why didn’t I make a backup before I started playing around with this stuff like Grandmaster Aikibujin warned me!?!” Never fear! For I have foreseen this eventuality and have already come to your aid! Before it even happened!
So if you find yourself in the situation where you need a current backup, but haven’t made one, or your backup is really dated and you need a more recent one, do the following:
Click Tools, choose preferences, choose backups.
Here you will see some options for controlling automatic backups, which happen every time you close Anki! ![]()
To retrieve one of these backups simply click: Open backup folder
This will open your backup folder, and you simply open up the latest backup or whichever one you need to go back to (You probably don’t need the default 50 ![]() ).
).
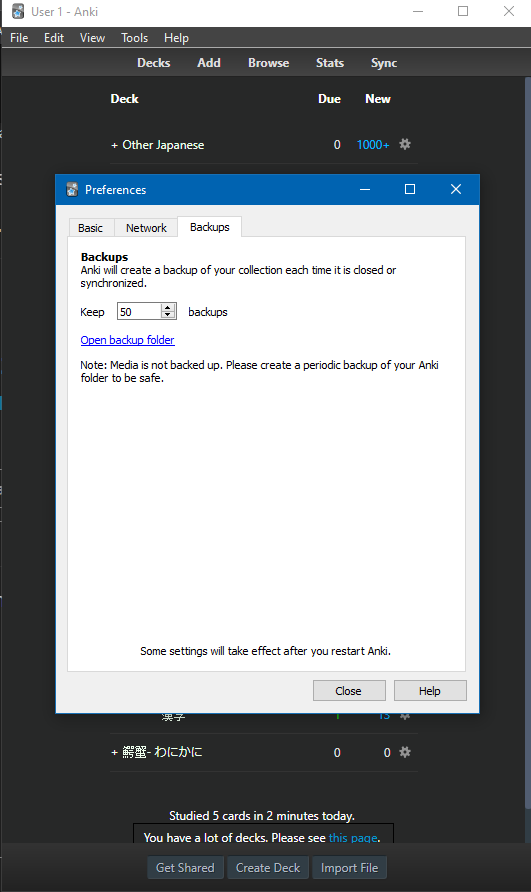
Obviously now that you know where the folder is, you don’t need to navigate to it through Anki, but you can if you wish. ^ _ ^
Now you should be safe to proceed further.
Ankiweb Syncing
This feature allows you to sync your cards across multiple devices.
Looking at the main menu, click on Sync.
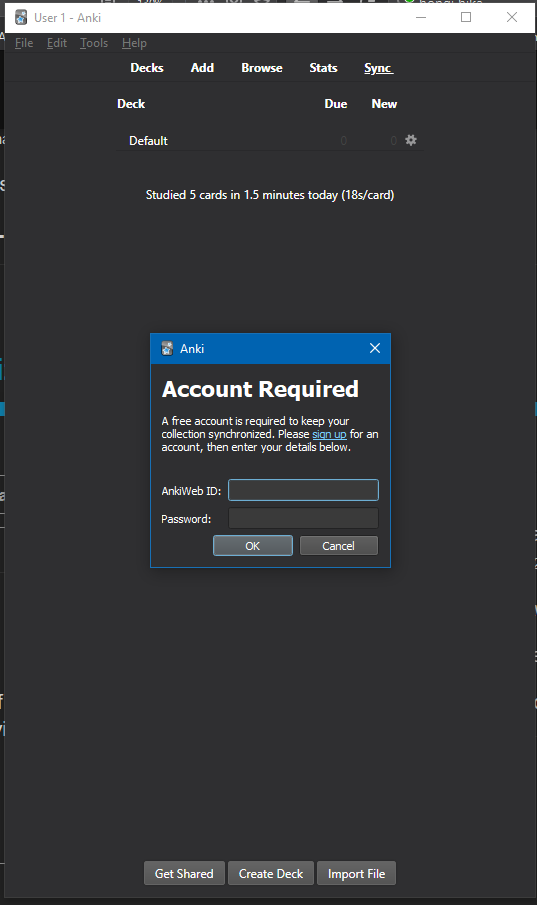
Click on sign up unless of course you already have an account, in which case pop in your AnkiWeb ID and Password.
Next you need to decide how you want syncing to work:
Go to Tools → Preferences → Network Tab

If you have “Automatically sync on profile open/close” selected each time you open or close Anki it will automatically sync your current decks with the decks saved on AnkiWeb.
This is particularly important if you want to use Anki on multiple devices. For instance, if you use Anki on your Hi-Tech PC and forget to sync to AnkiWeb when you are done, then decide to do some reviews on your super wicked Android phone (sorry Mac users, this stuff might extend to you, but it’s probably different), it obviously won’t have the data from your previous session, and what’s more if you don’t realize that until the end of your session (entirely possible if you have a lot of decks and cards) you’ll have to choose to either upload your current session to AnkiWeb, which won’t include your previous session, or overwrite your current session with what’s on AnkiWeb, which means you’ll lose your current session, but could then go back to your PC and sync that to AnkiWeb saving that session. You’d have to decide which one is more important to keep.
So if you decide to allow it to sync every time it opens or closes, this is much less likely to happen, unless of course you forget to close Anki after one of your sessions, leaving you in the same boat.
If you have made significant changes in your current session (adding new decks or cards) it will often ask you if you want to upload your current decks to Ankiweb or download your previous ones that were stored on AnkiWeb. If you’ve screwed around with a lot of stuff and want to discard what you’ve done, you could choose to download your previous decks stored on Ankiweb.
You can also choose to do this manually by clicking on “On next sync, force changes in one direction.”

The next time it syncs it will ask you if you want to upload your current session or download your previous session, thus overwriting your current one.
Obviously this is also good for the standard purpose of syncing to the web, which is if something has bricked your system and you have no backups stored locally, you can still retrieve your last synced session.
Generate Audio Files for All of Your Cards Automatically!
Generate Audio Files for All of Your Cards Automatically!
** Warning **
The following uses an add-on. Though add-ons are a supported feature of Anki, this is an independent modification to Anki produced by users, rather than the developers themselves, much the same as the third party apps you can use for WK. Thus keep in mind these add-ons could cause errors with Anki and may stop functioning after major updates. As they are also third party programs, they do have the capacity to contain malicious code. Use at your own risk. @_@
That said, you can always check the ratings on the Anki website and just avoid add-ons with negative reviews, users will also usually state why they gave said negative review. As far as the following add-on goes I haven’t had it cause any errors with Anki, but I have occasionally ran into errors with the add-on itself. As far as updates go, if they do come out with a new version of Anki that is incompatible with this add-on, in all likelihood it will only stop you from adding new audio to your cards, whatever files you have already generated, should continue to function.
Add Audio to All of Your Cards Automatically!
To start, make sure you back up your decks before using any add-ons.
From the main menu click Tools → Add-ons → Get Add-ons → Browse Add-ons

This will send you to a website with a general list of Anki 2.1 add-ons
Hit Ctrl+F and type:
AwesomeTTS
Click on the link. It also wouldn’t hurt to read the page.
After the warning about only downloading add-ons that you trust, you will find the following code:
If you accept the risks, copy that code: 814349176
Go back to Anki and paste it into the bar:

After hitting OK, restart Anki as it commands.
Now click Tools → AwesomeTTS (or just click Ctrl+T)

Go to the “Advanced” tab.
And click on “Manage Presets”

Under Configure Service, click on “Generate using” and choose Oddcast

By Voice, choose: Kyoko (female ja)
This is probably obvious, but that selection represents a voice named Kyoko who is female and Japanese.
Click Save and OK (or rename it if you wish)

Now choose Misaki (female ja)
Click Save and OK
Now choose Show (male ja)
Click Save and OK
The next thing you need to do is figure out which voice you prefer.
Down on the bottom left next to save, choose: Oddcast (ja/show)

Now under Preview, type something in Japanese like: ありがとうございます!
We want something that is long, but extremely common, i.e., you should already be very familiar with what this sounds like in Japanese.
Hit Preview until you have a good feel for what it sounds like.
Then choose Kyoku at the bottom left and do the preview again.
And finally Misaki.
Now you need to think of who you like best and in what order.
For me it’s: Show → Kyoku → Misaki (opinions may vary)
Once you are satisfied that you know your preferred order, click OK to close that window.
Now click on Manage Groups

Click the green +
Name the new group “Oddcast Japanese” and click OK

For Mode choose “In-order”
Click the green +
Select the voice you prefer most.
Now repeat this process with the following two in your preferred order.
Mine looks like this:

Click OK
What this will do is choose your preferred voice to generate sound for your card. However if there is a problem, and it can’t use your first choice, it will then try to generate the sound using your next choice and so on.
Click OK again to get back to the Main Deck menu.
Now I’ve already got sound on the cards I want it on, so I’ve created a Test deck where I’ve just added three notes, which auto generated 9 different cards from them, as each note has generated a Kana card, a Kanji card, and a Meaning card (I show how to do this in previous sections).
Go to Browse and choose the Deck or Subdeck that you wish to generate sound for.
Click on an item and hit Ctrl+A to choose all the cards in that deck:

Now hit Ctrl+T
At the top left where it says “Generate using” choose “Oddcast Japanese” from the drop down menu.
This is the group we made before

On the right where it says “Source Field,” you need to choose the Field that you want the sound to be generated from. For me it will be “Kana.”
Where it says “Destination Field,” you need to choose your audio Field. This is where it’s going to record the sound file to and this is also the field that you need to use when you are designing your cards, so the sound plays when you want it to play (detailed in the Getting Your Cards to Play Audio section).
For me it will be “Audio.”
Then beneath that choose “Overwrite the Destination”
(If you already have audio files on your cards, you can choose append instead. This will keep your old audio file and then add the new one as a second file. This means that it will now play both files, but you can then choose which one you want to keep and get rid of the other. If you don’t want your old ones, also choose Overwrite.)

And now hit Generate!
Note: This can take a very long time if you have a lot of cards - It’s worth it!
That said, I would do them subdeck by subdeck if you have a lot of cards, or do them by tags. If you have more than a few hundred, don’t do them all at once as they can fail if it’s too big of a load.
I got the following:

Now if I choose one of my Notes and look at the Audio field I see this:

So all of the notes now have Show saying the Japanese that was inputted into the Kana field, recorded into the Audio field.
If I wanted to add English audio to the card (or another language), I could repeat the same process, but choose an English voice, from the country I want to select, and choose the Meaning field for my Source Field and the English field for my Destination Field.
Thus wherever I add the {{Audio}} tag it will play the Japanese sound file based on my Kana field and wherever I add the {{English}} tag it will play the English based on the input from the Meaning field.
For further details on how to get your cards to actually play the audio, see the first two sections concerning fields.
Just let me know if there are any questions or if you would like me to cover something else.
If you enjoyed this tutorial Slap that Like button like a Funky Bass!
![]()
Also check out:
