Perhaps I’m a little oblivious as a native kanji user (as a Chinese speaker), but this is precisely what the ‘standard script’ (楷書) brushstroke scripts are for. They only show the essential parts of strokes, and all that’s required is imitation using standard strokes while following stroke order. However, perhaps the fact that I’ve seen both the brushstroke characters and attempts to write them by hand side by side is what allows me to know what is ‘essential’ and what isn’t.
I’ll try to provide you with two examples, but I doubt they’re very good.

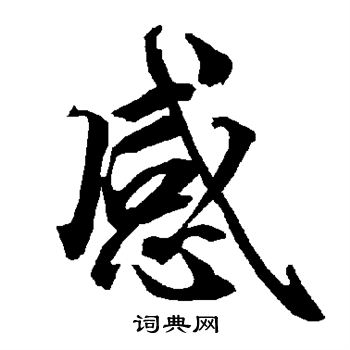
In this example, the little flick at the bottom end of the central dot (the 丶 to the left of a blue circle and a dotted arrow that curves back on itself) in the 心 component is non-essential. You can tell based on the fact that it doesn’t exist in the brushstroke-style stroke diagrams. Comparing multiple 楷書 (standard script) examples should allow you to figure out what remains unchanged. Honestly, even comparing multiple common computerised fonts should show you what remains unchanged. That’s the skeleton of each kanji that needs to be reproduced at the minimum. Like I said, if you remove all line thickness variation, you’ll see what the minimum is.
A second example using the same kanji, but in a semi-cursive ‘running script’ (行書) style:
You’ll notice that the size and position of 心 have shifted slightly. This is just a stylistic difference. There’s no easy way for me to explain this rule to you without lots of visual examples, but basically, in 行書, when there’s a long 乚 shaped more like 乀 and a small component at the bottom of the character (盛 is another example), it’s common to extend it as the ‘main stroke’ of the kanji and to shrink the ‘base’ element (e.g. 心、皿) while shifting it to the left. Notice all the extra details that have appeared relative to the stroke order diagram and the kanji written with a pen (which is in the 楷書 style): all those little links are there as a result of speed, but none of them is necessary to the recognition of the kanji. Notice also how the ‘lines’ as a whole stay the same. (This is in large part simply because we’re not looking at an example that uses cursive shorthand.)
If you want more examples you might want to use this Chinese site:
Be sure to select ‘不限’ (‘not limited’=‘no filtering by style’ in this case, which is similar to 無限 in Japanese, which is ‘unlimited’ and therefore ‘infinite’; the difference is that 不 is a negation particle in Chinese=‘not’, whereas 無 means ‘non-existence’) before typing anything into the search bar so you’ll see multiple styles. You can ignore 草書(草书 in Simplified Chinese)if you want, since most kanji written that way aren’t what you need to learn and are very different from the standard script. (Of course, some Japanese kanji won’t turn up on that Chinese site, so please just use it as a tool for style comparison. I’m recommending a Chinese site because for some reason, the Japanese internet doesn’t seem to have gigantic free calligraphy databases of that sort, unlike the Chinese internet.)
Another thing that might help you is seeing what most of the basic strokes look like when they’re isolated. Complex kanji are really just a combination of all these strokes at slightly different angles and with different ‘joins’. This diagram is very helpful because it shows you what the brush head looks like during the writing process:

More examples, especially of ‘hooked’ strokes, which often need to be kept ‘hooked’ in order to be correct (though this is not so often the case with Japanese kanji, which allow more variation than Chinese hanzi in their ‘standard’ handwritten form):

Ultimately, what I think would be more helpful is your sharing what you find hard to distinguish as ‘essential’ or ‘non-essential’. That might help me explain better.
I went for calligraphy classes in primary school (when I was around 7), so I guess I was fortunate enough not to need to find such instruction on my own. The first ‘isolated stroke’ diagram above shows you roughly how the brush (and thus the tip of the pen) should be moved to create the right contours. Here’s another example with 永, which is often used for calligraphy instruction because it’s a kanji that contains all the basic strokes:

(The names for each type of stroke are in Chinese. Japanese uses other terms, as far as I know, so don’t worry about learning them.)
The only major problem with this diagram: the instructions for making 乀 are wrong. You get that thickness by pressing hard with your brush/pen, and you don’t loop: you change the angle of the stroke as you finish while releasing pressure/lifting the brush. Everything else is fairly accurate.
My final recommendation would be to watch calligraphers at work with either a brush or a pen. This person (Takumi) has already been recommended to you because his pen writing is generally quite clean and simple:
You’ll probably (and perhaps ironically?) learn more by watching videos in which he writes kanji with more flourishes, however, because that’s where his use of various techniques becomes obvious. Pay close attention to how the pen nib moves and when he makes more exaggerated movements or moves the pen faster. Also pay attention to when and how the pen stops. Stopping is also essential to creating certain effects, especially when stroke direction changes more than 45º or so. It’s probably easier to see variations in pressure and speed with a brush though (the brush head will flex), which is why I recommend looking at such examples as well. This example of hiragana writing should be instructive:

Here’s another example, this time from a well-known Chinese calligrapher speaking in Mandarin. He’s writing in the 行書 style. You may not recognise all the kanji, and that’s OK (it’s a very long video anyway, so feel free to skip around) – pay attention instead to how he moves the pen and how that creates certain effects and contours. 行書 is particularly good for studying how flicking the pen or stopping it abruptly changes the ends of strokes and allows faster writing by ‘disengaging’ from one part of a character or by ‘transitioning’ smoothly to the next:

(And so uh… yes, my calligraphy style is based on a course he wrote. I doubt there are any obvious similarities though.)
The techniques used are always the same. How they’re applied just varies depending on the style of writing.